Thursday, November 15, 2012

Creamy, bacony, garlicky goodness!

Years ago my best friend and then co-worker Andrea, lover of all things Italian (no she's not Italian) made Pasta Carbonara.  She'd made it for dinner one night and after talking about it at work she made some and brought it for us to try.  I honestly didn't think it would be very good because 1) she is a self admitted non cook and 2) cooked eggs the next day, really?

Boy was I wrong; her Pasta Carbonara was excellent!  It was flavorful and creamy.  Honestly I don't think I have ever replicated her dish as well as she did.  Non cook?  Yeah, right...whatever you say!

Having some time on my hands, lots of time, I decided to make Spaghetti Carbonara for breakfast.  I mean, really, if people in Italy actually eat this for breakfast why can't we?  It is after all bacon and eggs with a little cheese thrown in.  Anyway, my version turned out pretty albeit a bit salty (I'll tell you about my mistake later).

From what I understand, in Italy plain, leftover spaghetti is used like this for breakfast.  A good way to use up extra pasta.  I think it's cooked a bit differently and I'm sure theirs tastes much better though.  I mean come on, Italian food from Italy is a no brainer.


Now for some prep pics:

I used bacon instead of pancetta. Let's face it: pancetta is expensive and I had bacon on hand. I also cut the bacon larger than usual because I thought it looked better...especially for breakfast.


Next I used plain ole basic thin spaghetti. Had that on hand too.


Onion and garlic cooked in bacon grease...seriously, is there a more perfect combination? Nope, can't think of anything.


Oh, let us not forget the garlic! Ok, confession time...I used a wee bit more garlic than necessary. It was still good; I just know for next time to use just a couple of cloves!


Three egg yolks, a splash of olive oil, grated Parmesan, fresh parsley and black pepper later and voila....

Hungry?
 
Oh, my 'salty' mistake...I used some of the pasta water in the finished product to pull the sauce together, just a ladle full...but I forgot that I had salted the water when I cooked the pasta...I won't do that again!  All in all this was a really good brunch.  Will definitely make again.  I think some fresh tomato added next time sounds great!


Sunday, May 29, 2011

Almond Puff Loaf

Yep, I've done it again, another King Arthur Flour recipe copy.  Anytime they post a recipe that looks interesting, especially those I've never tried before, I'll try it.  This recipe looked good and I had all the ingredients on hand.  And, I was pleasantly surprised to see that this recipe didn't require a lot of different ingredients just very basic ones. 

This almond puff loaf is unique because it is made up of two different doughs, pie dough and pate a choux.  The pate a choux is gently scented with either almond or vanilla extract and the whole dessert is topped, while it's still warm with the jam of your choice, a quick vanilla icing and almonds.  And speaking of almonds, be sure to toast some almonds to a GBD (golden, brown, delicious).  Set them aside to cool; you'll be using them later. 

Make the traditional pie dough.  Mix 1 cup of flour (I use King Arthur), one stick of butter and 1/4 tsp. salt in the bowl of a stand mixer to combine.  Since this is a traditional pie dough its OK to have larger pieces of butter.  Add 1/4 cup of cold water.  Mix until just combined.


At this point I had to decide if I wanted to make a coffee ring type dessert or make two 'loaves'.  I chose to do it like they did on the King Arthur site.  I weighed the dough and it came it at 10.5 ounces.


Divide the dough evenly in half and with moistened fingers pat each log on lightly greased parchment paper. The logs should be about 10 x 3 but you don't have to be precise.


 At this point I put the pan in the refrigerator because the pie dough got a little soft and I wanted it to firm up while I made the pate a choux.  Ah, the making of the pate a choux...I haven't made pate a choux since culinary school.  It's not hard to make and it's very versatile, it can be made to be either sweet or savory but it's not something that is commonly requested by my usual customers.  Anywho, the pate a choux...

Bring to a boil in a medium pot one stick of butter, 1/4 tsp salt and one cup of water.  Add one cup of AP flour all at once.  Using a wooden spoon, stir for about 2 minutes to cook the raw flour taste out and make sure all lumps of flour are worked out.  Pour flour mixture into the bowl of a stand mixer and and mix on medium (4-6 on a Kitchen Aid mixer) until the mixture has cooled down and the bowl is just warm to the touch.


 At this point you'll add 3 eggs, one at a time, mixing well after each addition.  Once all the eggs are added the mixture should look like this:


At this point add either a tsp. of almond extract or, if you aren't as partial to almond, add 1 tsp. of vanilla extract.  I added 1 tsp. of each.

This is the point where I differ from the King Arthur recipe a bit more.  Using a box grater, I grated some almond paste on the now chilled pie dough.  I pressed the almond paste pieces lightly into the dough like this:


Before I continue, let me say a bit about almond paste.  I absolutely LOVE almond paste!  I love anything almond as a matter of fact.  I think almond paste takes desserts to another level, elevating them to perfection.  So, it was not a hard decision to add the almond paste to this dessert and I must say, I was not disappointed. 

After adding the grated almond paste, I divided the pate a choux between the two chilled and almond paste filled pie dough log, covering them completely.


Bake in an oven preheated to 400 degrees for 10 minutes then reduce the temperature to 350 and bake for about 35-50 minutes more or until the top layer is golden brown.


Now, the fun and creativity begins!  The usual fruit topping on these almonds puffs is apricot, or at least that's what is used on the King Arthur site but they encourage you to use what ever jam or fruit topping you'd like.  When I first tired this recipe I used apricot jam per the original recipe just so I could get a feel of what I could change to make it work better for me.  Apricot was OK, not my absolute favorite.  Since my favorite jam is strawberry, this is what I used on one and the other I didn't add any fruit topping, only the quick vanilla icing and toasted sliced almonds.

The end result looked like this:


Don't these look lovely?  Well, they also tasted HEAVENLY!  I love the addition of the almond paste, it really did elevate this pastry to another level.


Sunday, January 30, 2011

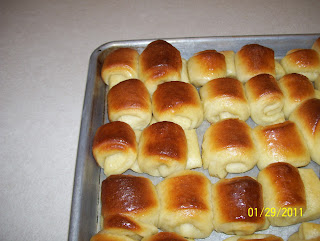
I'm FINALLY happy with a recipe!

I have experimented with several yeast roll recipes over the years.  I've tried some made with all water, some made with all milk, a combination of milk and water, some made with and without butter.  I've been moderately happy with the results but never really completely satisfied.  I wasn't getting that 'mouth feel', crumb and taste I was looking for...you know what I'm talking about...the little old lady from down the street/from church/on of Mom's friend/Ms. So and So who would bake yeast rolls to die for...I never could duplicate exactly what I've been looking for until now. 

I frequently follow the Baker's Blog on the King Arthur Flour Blog. I've made a few of the recipes with really good results.  A couple of weeks ago they posted a Parker House roll recipe.  Now since I was still on the hunt (not actively or officially) for a good yeast roll recipe I decided to try it.  The ingredients were all things I keep on hand and the process was incredibly simple.  So, I thought, why not try it?

I have to add this recipe has been adapted from the Parker House roll recipe on the King Arthur flour site.  I say adapted because the first time I made the rolls I used their recipe verbatim but after that I've used my own changes and I like the changes.  I really do.  I'll give you the original recipe with my changes in parentheses.  If you make these rolls with the changes, please come back and comment letting me know how they turned out for you.

Parker House Rolls - Adapted from King Arthur Flour
1 cup of milk
1 egg

Mix and egg together.  Heat gently in the microwave just to take the chill off.  I actually heated the egg/milk mixture to about 105 degrees since we are adding it to yeast.  Don't go much hotter than that or you could kill the yeast.


In the bowl of a stand mixer fitted with a dough hook add:

3 cups King Arthur flour
2 1/2 teaspoons instant yeast (1 1/2 tablespoons)
3 tablespoons sugar (1/2 cup)
1 1/4 teaspoon salt
1/4 cup potato flour or 3/4 cup instant  mashed potato flakes
3 tablespoons butter - straight from the refrigerator is fine (6 tablespoons)


Add milk/egg mixture


Stir the ingredients together into a shaggy, cohesive mass.


Knead for about 8 minutes.  I use level 2 on my Kitchen Aid mixer and I also set the timer for 8 minutes so I won't forget.  After 8 minutes the dough should come together in a smooth ball.


While my dough was kneading I preheated my oven to 200 degrees then turned it off.  I do this because it is winter and my house isn't exactly warm.  By the time I'm ready to add the dough to rise the oven is at the perfect temperature.

Place the dough in a bowl, cover with a clean tea towel and let it rise in a warm place for approximately 90 minutes.  Yep, I set the timer for this too.


Although I increased the yeast to compensate for the additional sugar and butter I added, the dough still won't double in bulk.  That's ok.  It will rise a good bit though.


At this point I punch the dough down and divide it in half with a bench knife/scraper.


As I work with one half, I leave the other half covered under the bowl I just took it out of.

This is where I really differ from the King Arthur site.  The shaping of the rolls.  They divide the dough like I did then rolled it out, brushed butter on it then cut it in half.  They then folded each half in half and cut each of the halves into four relatively equal pieces.  This method is fine if you want larger rolls but in my 'bread devouring' family a total of 16 rolls, no matter how large, just would not be enough! 

What I did was roll each half of the dough out pretty thin, cut it into strips then the strips in four pieces.  Each piece I thin folded over twice.


I then placed the folded rolls on a buttered, rimmed sheet pan.


After rolling out and folding both halves of the dough I covered the pan with a tea towel and placed the pan back into the now cooler oven to allow the rolls to rise again for 45 minutes.

At the 30 minute mark I take the pan out of the oven and preheat the oven to 350 degrees.  If the rolls have popped open a little just gently press them down a bit or tuck the bottom fold under to secure it.

Bake the rolls for 15-22 minutes or until they are GBD (GoldenBrownDelicious) and feel set.


Brush (or slather, your choice) the tops with butter as soon as they come out of the oven.  Enjoy!

I have  reheated the rolls wrapped in foil and heated for about 10 minutes for a freshly baked taste!

Sister Schubert?  Nope.  She's good and all but Sis can't touch these!


Tuesday, April 20, 2010

Creamy Lemon Pie

When I worked for Bankers Trust (the BEST job in the world...no kidding) we had a full cafeteria in the building.  A couple times a week they would make these lemon pies.  They were creamy, not too sweet, not too tart with a dollop of whipped cream on top.  The first few times we (my friend Andrea) had this pie we quickly found out we weren't the only ones who liked it.  Sometimes if we went to lunch later than usual the lemon pie would be gone...oh the horror!  Thus we learned to go to the cafeteria right when they started serving lunch and buy two pieces...one for breakfast and one for after lunch.  Yep, it was just that good.

Of course I asked the baker for the recipe and believe it or not, he gave it to me.  Surprisingly simple, I've never written it down but I've remembered it since.  I'll share the recipe with you and if you make this pie, please leave a comment letting me know how much you like or don't like it, however, I'm certain you'll like it.  Trust me.

Creamy Lemon Pie

1 can sweetened condensed milk
1/2 cup lemon juice (freshly squeezed is best but not totally necessary)
3 egg yolks
Pinch of salt
1 store-bought graham cracker crust
Whipped cream (optional)

Preheat oven to 350 degrees.  Mix sweetened condensed milk, lemon juice, egg yolks and salt until well combined.  Pour into pie shell and bake for 20 minutes.  Check the pie at this point and gauge how much time it needs between 5 and 10 minutes.  The pie should be slightly soft when you take it out.  Let it cool completely on a wire rack.  Cover the cooled pie with whipped cream if desired.

I used a store-bought graham cracker crust and whipped cream.  Now, if you know me you know I don't do a lot of pre-made foods.  I really prefer to make any and everything I can from scratch with very few exceptions, very few.  The graham cracker crust is one exception.  The ones in the store are almost just as good as homemade an a ton easier.  Now, the whipped cream.   Making whipped cream is a breeze.  Heavy whipping cream, powdered sugar, vanilla and a mixer...voila, whipped cream.  I could go on about all the add-ins you could use but I won't, not yet.  Since I made the pie for Sunday dinner's dessert I just bought it.  I shouldn't have.  It wasn't sweet enough and it had a 'funny' consistancy.  But hey, I know better for next time.


Saturday, April 17, 2010

Granola...

I've always liked granola, well mostly.  I have had bad granola, dry, tasteless, not sweet enough.  One day I had an inspired idea to learn how to make my own granola.  I knew that it was customizable and I would be able to make it my own.  Isn't that what all chefs want to do, make recipes their own?

One way I research recipes is I look up several similar recipes on the internet, taking from each facets of what I like most and disregarding the rest.  I then take all the individual parts and come up with my own recipe.  That's what I did with my granola, my Vanilla Almond Granola. 

Most recipes I researched called for varying combinations of white sugar, brown sugar, vegetable or canola oil, flax seed, honey, dried fruits, nuts and, of course, oats.  I took from this list the ingredients I like, in the proportions I thought were appropriate for my tastes.  The first couple of times I made the granola I carefully measured everything.  I didn't want it too sweet or not sweet enough and most of all I wanted it to taste good.  What I came away with was a very flavorful, hearty and somewhat healthy granola. 

Eat it straight for a snack.  Add raisins and milk for a great cereal.  My favorite way to eat this granola is with vanilla yogurt for breakfast.  It can be stored for about a month in an airtight container.  I'm guessing it will last about a month because it never lasts that long in my house!

I can tell you what's in mine but the proportions and other add-ins will have to be all your own.

Oats
Brown Sugar
Flax Seed
Vegetable Oil
Slivered Almonds
Sliced Almonds
Vanilla
Cinnamon

Mix your choice of ingredients with the exception of dried fruits (add them after the granola has cooled), place it in a single layer on a baking sheet sprayed with a non stick spray, lined with parchment paper or use a Silpat for easy clean up.  Bake on 325 for about 15 minutes.  Remove from oven and stir.  Continue this pattern until the granola has reached the desired shade of GBD...What is GBD, you ask?  Golden, Brown and Delicious!  I'll use this term a lot when describing baked goods!